Showing posts with label Recipes. Show all posts

Tuesday, December 4, 2012

Trim and Cook: Sofrito

Sofrito
We have talked about the importance of trimming and caring for your plants. It is very sad (Editor's note: very, very, very sad) when you have to clip away unmercifully because that culantro won't stop growing or when you have been away from the kitchen so long that you have more peppers than you can use. Pretty sure this should be the case of our loyal readers because if you have been following our blog your garden must be sprouting and blooming in abundance.

Or maybe not, but for the sake of argument let's say it is. What to do with all those spare spices, leafs and vegetables? Sofrito! Sofrito is part of our Spanish heritage but is has changed and evolved in every Latin country becoming a unique combination in each country. In Puerto Rican cuisine, sofrito is used when cooking legumes, meat stews, and sauces.

Sofrito ingredients
Commercial sofrito in Puerto Rico combines tomato, onion, green peppers, cilantro and garlic. However, the best sofrito is the one made at home.  (Editor's note: Commercial < Home-made... Always) Yes, use those plants you have in your garden to make your very own sofrito. In Puerto Rico we have a saying: “como mami nadie cocina”, which means that no one cooks like mom. It proves to be right every time, and sofrito is not the exception. Although my mom claims to not have a recipe, I've watch her do this for 30 years and yes she does have a recipe, just not a written one, which makes it even better tasting. This is my mom’s recipe which yields approximately an 8 oz bottle or bowl:
  • 8 leaves of culantro
  • 1 bush of cilantro
  • 1 garlic head
  • 1 medium onion
  • 2 cubanelle peppers
  • 10 “ajies dulces” (Capsicum chinense)
You can add other aromatic plants, like basil or thyme, to your liking. Add capers and even cured ham to put in up some extra salty flavor. Many sofrito recipes contain tomatoes. Not recommended. Tomatoes keep ripening inside the mixture and the fruit acid causes the sofrito to turn bad faster. Cut everything to small pieces and blend, preferably in a food processor so it remains chunky. If a food processor is not at hand, use a blender.

Store in the refrigerator until ready to use, it will be good for about 6 months. You can also store in the freezer for longer periods. When ready to use, sauté one tablespoon of sofrito in olive or cooking oil for a few minutes before adding the rest of the dish ingredients.

Be bold and add any other aromatic ingredient and create your own unique recipe. Mix and match flavors using your favorite combinations or even experiment with combinations that work best for each of your dishes. Maybe adding rosemary and mint when using it for red meat stews, and thyme and cilantro for seafood. Keep good care of your garden, trim, cook and let us know how it worked with your own special mix of sofrito.

Wednesday, June 13, 2012

Grow and Bake: Herb Bread

Ready-to-eat soft herb rolls.
A great way to make use of your edible garden plants is to improvise in the kitchen once in a while. I love the kitchen and I've made quite a few recipes with our garden fruits (and veggies), some of which I've shared with you such as a basil pesto, and arugula pesto recipe. Today I want to tell you about a bread recipe we tried. A dear friend (you know who you are and we hope you are reading this) came to visit us and he taught us how to do several kinds of bread. Of course, we wanted to use our garden herbs to make them more tasty. We initially used thyme but we have repeated the recipe several times using basil and rosemary. These three herbs are among the Top 8 Herbs to Grow for Bread Baking.

Making bread is tricky. It's not just about following a recipe. You need to familiarize yourself with certain basic concepts and have some specialized equipment at hand. Let's go over them.

Before you even start looking at the ingredients you will need the following equipment: a measuring scale, a mixer, and a baking thermometer. You will need a scale to measure ingredients because their weight is affected by humidity and elevation. The mixer is optional but preferable as it takes a lot longer to knead by hand. The thermometer needs to be able to measure up to 400ºF (200ºC). Beware that most meat thermometers do not reach these temperatures.

The bread recipe we use includes ingredients you are likely not to have at home, so make sure you have all the ingredients before starting anything.

Ingredients:
  • 12.5oz (375g) water
  • 0.75oz (22g) yeast, fresh
  • 1lb 5oz (625g) bread flour
  • 0.4oz (12g) salt
  • 2oz (60g) sugar
  • 1oz (30g) nonfat milk solids
  • 1oz (30g) shortening
  • 1oz (30g) butter
Mise en place
Perform your mise en place (Editor's note: yes, Jessica also likes the fancy words) by placing each weighted ingredient separately in small bowls. Either by hand or in the mixer start by mixing fatty ingredients such as shortening and butter. This will start breaking the fats which makes everything mix better. Add the salt, milk solids, water, and sugar and start adding little by little some of the flour. After mixing for a minute or two, stop the mixer.

Lay a bed of flour on the top of the mixture and on top of that add the yeast. Note that the recipe calls for fresh yeast but we used instant yeast with no observable differences. You can substitute for active yeast but this is not recommended as the dough will not rise much and the bread will be dense and hard (believe us, we know by experience). You want bread to be soft and fluffy. Top the yeast with more flour and start mixer again. The reason to place the yeast in between layers of flour is because the milk and salt kill the yeast. Add 1/4 of the remaining flour and then gradually keep adding flour. It is possible (although unlikely given Puerto Rico's humidity) that you won't need all your measured flour.

Pay close attention to the dough, it will start to separate from the mixer bowl walls becoming a ball around the mixer attachment. When the dough has detached completely, including from the bottom of the mixer bowl, stop the mixer and do the dough windowpane test. The dough windowpane can be verified by taking a tiny portion of the dough and stretching it between your fingers. You should be able to see the dough stretch about an inch without breaking. If the window breaks it is not ready. Keep adding flour until the mixture detaches from the bottom and the appropriate dough windowpane is observed.

When the dough is ready it is time to add your herbs. About 0.18oz to 0.28oz (5g to 8g) of your favorite herb is enough. Decide based on how strong the flavor of the herb is and the intensity you want on the bread. We used 5g of thyme, about 5g of rosemary and 8g of basil for ours.

Pinch dough while rolling
Fermentation is an important part of the process. Create a ball with the dough, folding the sides over the center towards the bottom part of the dough until you create a seam-free ball. Roll the dough in a tight circle on a flat surface such as the kitchen counter to make the surface as smooth as possible. Don't use too much flour to dust the surface, the dough must stick a little to the counter for the technique to work. Pinch the dough against a flat surface (read: kitchen counter) for better results.

Place the dough on a deep bowl and cover with plastic wrap. Let it ferment for 1 to 1-1/4 hours at room temperature. If you used fresh instant yeast, the dough should double in size. Remember that with active yeast, the dough won't grow too much (yes, active sucks). When fermentation time has elapsed, punch down the dough allowing air to escape. The punch relieves stress on gluten, squeezes out excess carbon dioxide, and divides air pockets evenly which makes it easier to shape the dough resulting in softer bread.
First fermentation: 1 to 1-1/4 hour

This dough can be used to make loafs, soft rolls and even cinnamon bread. We decided to do soft rolls. Divide the dough into 2oz pieces, it will yield about 20 bread rolls. Roll each piece into seam-free balls as before.

Now we need to perform a second fermentation, better known as proofing, for 15 to 30 minutes in a high temperature, high humidity environment. Tip: You can use your microwave. Bring water to a boil in a small bowl and place your rolls inside. The steam will create enough heat and humidity for this second fermentation.

If you want your rolls to be nice and golden you can brush eggs whites or butter on top of the rolls. Bake at 400ºF (200ºC) until rolls have reached the same internal temperature. To check the temperature place thermometer (finally we get to use the thermometer!) from the side so as not to disrupt the aesthetic of the rolls. The rolls should reach the appropriate temperature in about 15 to 20 minutes.

Let them cool down a little before eating, chemical processes are still happening for several minutes after your remove them from the oven and the flavor would be different. Spread some butter or cream cheese and enjoy!

Update: Our "dear friend" came over to our house and notified us of some errors in this post. So we've made some slight corrections. We apologize for this inconvenience and thank you for choosing container gardening in Puerto Rico.

Sunday, March 18, 2012

Arugula Pesto

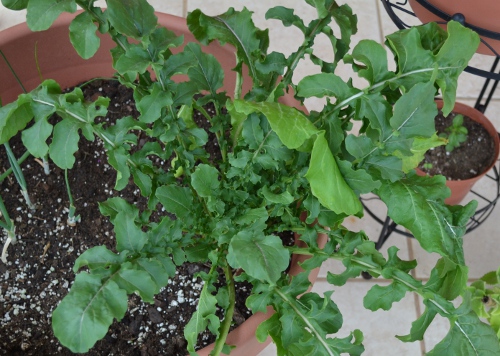
Our first Arugula. Has grown quite a bit, right?
Little has been said about our arugula since October's Arugula Follow Up. Our first plant has been growing and growing. It's now at the point where it will flower. We made a delicious salad for Thanksgiving with some of its leaves mixed with some lettuce (as we have mentioned before, arugula has a peppery flavor and ours is quite spicy so we can't use it by itself). We have also managed to grow one more arugula plant. Both plants have lots of leaves.

Because its flavor is so particular, arugula is also frequently used cooked as a vegetable. In this form it is used in pastas or even in pizzas, added just before the baking period ends or immediately afterwards, so that it will not wilt in the heat. Similar to basil, it combines really well with mozzarella cheese and sun-dried tomatoes and is good for pesto. Unlike basil, it is considered an aphrodisiac.(Editor's note: It seems Jessica is throwing out a hint to all of our female readers. Gentlemen, if your wife starts using arugula instead of basil, "It's on!".)

The process of making arugula pesto is not too different from the one described on our Basil: Yucky, Yummy Edition. Our previous recipe yielded pesto for about 6 to 8 people but I edited today's ingredients to make a dinner for 2.

Ingredients
(Mickey is the salt and pepper)
Ingredients:
- 1 cup packed fresh arugula
- 1/4 tablespoon minced garlic
- Salt and ground pepper
- 1/4 cup pure olive oil
- 1 tablespoon pine nuts, toasted
- 1/4 cup freshly grated Parmesan

Directions:
The secret for making pesto with arugula is to blanch the leaves. Plunge the arugula into boiling water for about 15 seconds. Next, plunge the leaves into ice cold water to stop the cooking process. Shake off the excess water and drain well.

Pesto with extra pines nuts
Squeeze the water out of the arugula with your hands until very dry. The rest of the process is quite similar to basil pesto. Chop the arugula and put in a blender or food processor. Add garlic, salt and pepper to your liking, olive oil, and a tablespoon of toasted pine nuts. Blend for at least 30 seconds. Add the cheese and pulse your blender to combine. You're done.

Prepare a meal and let us know about your experience with arugula in the comments section.

Sunday, August 28, 2011

Tricks and Treats: Mint Yourself

Mint or Mentha
I'm back with more Tricks and Treats! This time we'll talk about flavorful mint! The mint family is plentiful, frequently consisting of aromatic plants and culinary herbs. We have some of them in our container garden, such as basil, mint, rosemary and oregano.Today I'll address just the mint or mentha genus.

Tricks

Mint are mostly short-lived perennials that spread by underground stems. If you are looking for a particular species, start with small plants because with so many available varieties you might end up with the wrong one. Also sometimes seeds are slow, although this was not our case. Ours sprouted in a couple of days and grew savagely.

Mint is fairly easy to grow, it is said you can "plant and step back". It's best not to mix mint in a container with other plants as the roots tend to take over and can crowd neighbor plants. Actually our mint grew so much that it strangled itself. If this is your case, just prune back heavily and it will sprout again.

Treats

We tend to think of mint in terms of beverages but it actually has many culinary uses. Mint leaves are used in teas, beverages, jellies, syrups, candies, and ice creams. Numerous ethnic dishes are seasoned with mints of different kinds.

Besides its flavor, mint is highly regarded for its smell. Position your mint container where you can brush against it as you walk by or near your favorite seating spot and brush against your face after a busy day to calm your nerves. Mint is employed for medicinal use. Rub on itchy skin or on you gums to alleviate toothache. Mint also aids digestion; traditional after-dinner mints grows from this! Peppermint is a good antispasmodic, so you can use it on tea for menstrual cramps, diarrhea and tummy-ache.

Mint is almost instantly related to mojito! But to give it nice twist I want to share an original recipe: Raspberry Mojito. Super easy to do and delicious.

Raspberry Mojito
Ingredients:
  • Raspberry Rum
  • Club Soda
  • Sugar
  • Water
  • Raspberries
  • Mint!
Preparation:
Add water to sugar little by little until you create a syrup. Mix Raspberry Rum, Club Soda and sugar syrup in equal quantities. Gently mash mint leaves with a muddler. The mint leaves should only be bruised to release the essential oils and should not be shredded. Add some raspberries to the mix and leave the others to use as garnish along with some mint leaves. Cheers!


Saturday, August 13, 2011

Tricks and Treats: Basil - Yucky, Yummy Edition

Hi again, good to have you back! Today we have another edition of Tricks and Treats© for basil: Yucky, Yummy Edition! Specifically, we’ll talk about basil common diseases and some ideas on how to use basil. 

Tricks for the Yucky!

Always starting at the root… root rot is fairly common with basil. As the fungi needs moist cool soil to grow in, root rot might present by over-watering the plant. As a first sign, be alert for lower foliage that turns yellow or drops off the plant. The roots of the plant will appear brown and mushy, unlike healthy roots that appear firm and tan in color. To get rid of it, change the soil of the plant and decontaminate the container with a mix of 9 parts water, 1 part bleach.

Basil can suffer from several foliar diseases that can ruin the crop and reduce yield.
Gray Mold on our culantro leaves
A common disease of basil is gray mold; it looks exactly as it sounds. It can also cause infections post-harvest and is capable of killing the entire plant. Black spots can also be seen on basil foliage. Both can be controlled by spraying the leaves with a mix of half a gallon of water and one teaspoon of baking soda (not powder!).

Treats are the Yummy!

Basil Vinegar
Take all your excess basil snippings (which you’ll have lots when the plant starts flowering), stuff them loosely into a glass jar with a fitting lid, and pour enough vinegar to cover all foliage. Red wine vinegar is a great complement for basil. Wait about a week, during which time the vinegar will extract the flavor, aroma and color from the basil. Strain off, discard the snippings and voilà you have made basil vinegar!

When using basil vinegar for cooking, use your imagination. It sure can make a delicious salad dressing but you could also add it to pot roasts, stews, sauces or even over steamed vegetables. If you enjoy basil fragrance so much, another delightful use for basil vinegar is in the bath. Oh yes, soak yourself in aromatic hot water heaven. Add about a cup of basil vinegar to the bathwater, slip in and enjoy. Basil stimulates blood circulation so it is both invigorating and relaxing. Don’t be afraid to sink in and start making bubbles, basil vinegar can also be used as hair rinse. The vinegary smell dissipates quickly and you’re left a gentle herbal fragrance on your hair.

Pesto
Nope. The Pesto Night Story is not today. Pesto is traditionally made with pine nuts, garlic, olive oil, basil, and Parmesan cheese. It's most popular use is tossed with pasta.
Ingredients:
  • 4 cups basil leaves
  • 1/2 cup grated fresh Parmesan cheese
  • 2 tablespoons coarse-chopped pine nuts
  • 2 garlic cloves, peeled
  • 3 tablespoons extra-virgin olive oil
  • 1/4 teaspoon salt
Preparation:
In a food processor or strong blender, with the motor running, drop the pine nuts and garlic through the feed chute. Process until finely minced. Add the olive oil and pulse three times. Add basil, Parmesan cheese, and salt to the processor bowl. Process until finely minced. Refrigerate leftovers and use within 1 week. 

Have you bought your basil seeds? What are you waiting for!