Sunday, July 21, 2013

Tomato = Pear?

One ripe, a few green pear tomatoes
A little bit about ourselves. We don't like the same old stuff every day. We appreciate ingenuity, creativity, spontaneity.  So here we were looking at our garden and thinking "it's time to try something new". So we went online and bought a bunch of seeds for plants we could not find locally (read: New Seeds on the Block for all the details). Some of these were tomatoes.

There are hundreds of varieties of tomatoes out there. You, my dear reader, know a few of them and probably every single one  is a red, juicy fruit with limited flavor. So today, we will talk about something different; a yellow tomato. That's right, there are fully mature, yellow tomatoes. There are also green, pink and even brown tomatoes but we'll leave those for another day.

The yellow pear is an indeterminate heirloom tomato. You remember what an indeterminate is, right? Considering we haven't posted in ages you probably forgot. <start encyclopaedic account>An indeterminate tomato is one that continues growing until disease (or other agents such as frost for our US readers) kill it. These tomatoes need to be pruned of suckers to maximize output. They also require a trellis or cage to support them. <End encyclopaedic account/> What you probably don't know is what heirloom means.  Heirloom tomatoes are older cultivars that are not used for mass production. They are less resistant to diseases but have a stronger flavor profile than supermarket tomatoes. They are sought out by home gardeners due to their uniqueness in color, size, and flavor.

As always we recommend growing from seed since seeing something being born is one of life's enriching experiences. Seeds can be acquired from a number of local (recommended!) or online suppliers. Growing pear tomatoes is simple. Lots of water, a balanced fertilizer application every week, full sun (at least 6 hours of direct sunlight), good soil. The same way you grow a cherry or slicing tomato. After two months or so you will start seeing yellow self-pollinated flowers and a few days later very small delicate pear-shaped tomatoes will appear. Harvest once the fruits start turning yellow or leave to fully ripen in the vine; your choice. We recommend using in salads for their color, taste and small bite-size.

So what are you waiting for? Get out there and start trying out new things for your garden. you won't regret it.


Tuesday, December 4, 2012

Trim and Cook: Sofrito

Sofrito
We have talked about the importance of trimming and caring for your plants. It is very sad (Editor's note: very, very, very sad) when you have to clip away unmercifully because that culantro won't stop growing or when you have been away from the kitchen so long that you have more peppers than you can use. Pretty sure this should be the case of our loyal readers because if you have been following our blog your garden must be sprouting and blooming in abundance.

Or maybe not, but for the sake of argument let's say it is. What to do with all those spare spices, leafs and vegetables? Sofrito! Sofrito is part of our Spanish heritage but is has changed and evolved in every Latin country becoming a unique combination in each country. In Puerto Rican cuisine, sofrito is used when cooking legumes, meat stews, and sauces.

Sofrito ingredients
Commercial sofrito in Puerto Rico combines tomato, onion, green peppers, cilantro and garlic. However, the best sofrito is the one made at home.  (Editor's note: Commercial < Home-made... Always) Yes, use those plants you have in your garden to make your very own sofrito. In Puerto Rico we have a saying: “como mami nadie cocina”, which means that no one cooks like mom. It proves to be right every time, and sofrito is not the exception. Although my mom claims to not have a recipe, I've watch her do this for 30 years and yes she does have a recipe, just not a written one, which makes it even better tasting. This is my mom’s recipe which yields approximately an 8 oz bottle or bowl:
  • 8 leaves of culantro
  • 1 bush of cilantro
  • 1 garlic head
  • 1 medium onion
  • 2 cubanelle peppers
  • 10 “ajies dulces” (Capsicum chinense)
You can add other aromatic plants, like basil or thyme, to your liking. Add capers and even cured ham to put in up some extra salty flavor. Many sofrito recipes contain tomatoes. Not recommended. Tomatoes keep ripening inside the mixture and the fruit acid causes the sofrito to turn bad faster. Cut everything to small pieces and blend, preferably in a food processor so it remains chunky. If a food processor is not at hand, use a blender.

Store in the refrigerator until ready to use, it will be good for about 6 months. You can also store in the freezer for longer periods. When ready to use, sauté one tablespoon of sofrito in olive or cooking oil for a few minutes before adding the rest of the dish ingredients.

Be bold and add any other aromatic ingredient and create your own unique recipe. Mix and match flavors using your favorite combinations or even experiment with combinations that work best for each of your dishes. Maybe adding rosemary and mint when using it for red meat stews, and thyme and cilantro for seafood. Keep good care of your garden, trim, cook and let us know how it worked with your own special mix of sofrito.

Saturday, September 22, 2012

...and move it all around

Tempus fugit! It's already been more than a year since our first post (Hello there world - August 9, 2011). Wow! Never thought we would still be doing this after a year. But here we are, non the wiser. Well, maybe just a bit wiser.

When we started everything was going great, full steam ahead. We were producing lots of tomatoes, peppers, cucumbers, flowersstrawberries, etc. Happy times! All that stopped a few months ago. Plants languished, production went significantly down, growth stalled. Part of it was poor care and maintenance (mea culpa) but that couldn't be the whole problem. Something else must be at work. After some deep thinking (and online research) I think we might have stumbled upon the root of the problem: Soil.

Soil!? But isn't soil one of the advantages of container gardening. Not having to worry about it. So we thought. In sub-tropical climates container gardeners rarely have to worry about soil. They plant at the beginning of the season with fresh soil and at the end of the season when plants die soil is discarded (or even better, used towards the compost bin). Fresh soil is then used when spring comes around. In tropical climates where perennial plants are common soil becomes an issue.

Here's what happens to soil after time passes.

1. Nutrients are depleted - Nutrients are depleted from the soil as plants consume them. Not a real issue with containers since we administer fertilizer on a regular basis (you are administering fertilizer, right?).
2. Soil collapses - Soil tends to collapse and become compacted. Nutrient absorption may be reduced due to this. However, this is usually not a big concern in containers.
3. Pests and diseases - Pests and diseases develop in soil as time goes by. These organisms may become dormant until the right conditions (temperature, host, etc) are present. Diseases typically affect a family of plants rather than a single species. Very important since a few common plants (tomatoes, peppers, potatoes) belong to the same family (Solanaceae).

Pests and diseases are the biggest concern to reusing soil. Soil harbors many types of viruses and bacteria. Healthy, mature plants are barely affected by these organisms. However, young plants are vulnerable (plants behave similar to humans, the young and the old are usually the most prone to disease). Therein lied our problem. We had a few combopots with spices, greens, ornamentals, and fruits. Spices are, with some exceptions, perennials; greens are annuals; ornamentals may be either annuals or perennials. Fruits usually have to be replaced after a season, two at the most, since their production is greatly reduced as time goes on. Since we didn't want to lose our spices and herbs we kept out pots intact, soil and all. Mistake 1. Then we went and compounded our mistake with Mistake 2: Replanting species in the same containers. Right on cue diseases started attacking our young plants with most plants never being able to produce fruits.

If you have monopots the solution is simple: Discard soil at the end of the growing season. But what to do with combopots where soil cannot be completely discarded? There is a simple solution. Crop Rotation. This technique is used by large scale farmers around the world. The idea is to move crops around and not grow plants from the same family in consecutive seasons. So if you planted tomatoes in one container your next crop could be arugula or lettuce. If you had peppers then you can alternate them with strawberries or onions.
Simple, right? So learn from our mistakes and rotate your crops.

Saturday, August 25, 2012

In Living Color

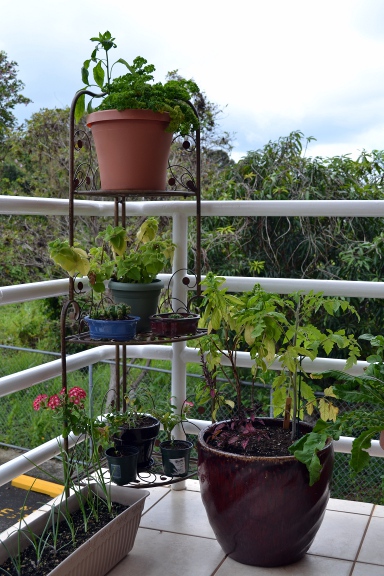
Seed grown Coleus in a white container with
some common green plants.
Red and green are complementary colors
We've been away for two weeks visiting a slightly larger island than Puerto Rico called Great Britain. We weren't there on any gardening related adventure (rather just catching some Olympic games) but we saw some interesting concepts that we will probably cover later. <End Completely Unrelated Sidenote.> In our last post (we trust that you read it, but just in case here's the link) we talked about planning your garden, about the importance of a theme. We also talked a bit about taking into consideration the shape and color of your plants to make your garden and containers more interesting. According to Ray Rogers writer of The Encyclopedia of Container Plants (highly recommended) there are five plant design attributes: color, line, form, space, and texture. Today we'll present an example of how to use color in your garden although we're by no means experts (wow, that's a shameless plug of our motto).

Simple color wheel containing primary, secondary,
and tertiary colors
Color theory revolves around the use and combination of primary, secondary, and tertiary colors. We will not go into a detailed explanation of how color theory works (mainly because I don't understand it well myself but also because the link provided does a pretty good job itself) but suffice it to say that the idea is to combine colors which complement each other. A color wheel is very helpful for those of us who need a visual aid to remember how colors interact with each other. When designing your garden you need to consider not just the color of your plants but also the color of the container, background, and even the surrounding plants. Doing so will allow you to create magazine quality displays. Most people relate color in plants to flowers. Understandable with plants being primarily green. The problem is that flowers (with some minor exceptions) are fleeting, delicate things. One day they're here, the next they're gone. Thankfully, there are some plants that are able to add color to a container without producing flowers. One in particular is the example we wish to provide today, Coleus.

White variegated coleus
growing around a bromeliad.
According to Wikipedia the name Coleus was an earlier genus that scientists have recently divided between two genus: Solenostemon and Plectranthus (cookies for anyone who remembers another plant from this genus. Hint: it smells like oregano). There are hundreds of species and cultivars sold as Coleus. Any of them can make an interesting addition to a container garden but we are mainly interested in Solenostemon scutellarioides and its various cultivars. This species occurs naturally in the tropics (Southeast Asia) where it is considered a perennial. In colder climates it is grown as an annual. It generally prefers partial shade but new cultivars have been created that are better suited for full sun. Depending on the cultivar it can trail close to the ground topping at only 4 inches or grow up to 3 feet tall. The size of its leaves is also very varied with some being as small as a few inches while others can grow as large as a foot. Propagation can occur by seeds or though cuttings. The more stunning cultivars are available through cuttings only so you will need to buy young plants from your nursery for the ultimate color punch. We've grown both seed and cutting varieties and the difference is significant (contrary to our usual stance cuttings > seeds).

Two small Coleus and a Bromeliad on an orange container.
Purple, red-orange and green are split-complementary colors.
The reason we love Coleus so much (and the reason we are using them as an example today) is its leaves, which come in every color under the sun, except blue. (Interestingly enough the flowers from the original species are blue, flowers of the cultivars might have other colors) These leaves are usually variegated which adds to the interest. With so many colors it's no wonder that this is one of the most popular garden plants. Young plants are usually available in the nursery all year round but are more prevalent in spring or early summer. Once you select the plants you need to determine the sun conditions under which they will thrive. Too little or too much light may cause the leaves to lose color. Start the plants in partial shade and gradually move them into higher sun intensity. Each plant will let you know how much light it's able to tolerate. Soil must drain well and be maintained evenly moist. After a few months flowers will emerge from long stalks. We recommend pinching them to promote bushy, compact growth although some people like the flowers (to each its own I say). We recommend a balanced fertilizer every 2 weeks. As far as pests are concerned we've seen some aphids and whiteflies which haven't adversely affected growth.

Now that you know how to grow Coleus it's time to use it. Again the basic principle is to combine colors to create a stunning display. Since most plants are green you can use Coleus to break the monotony in any container. For example, you may use a red Coleus in a herb container. Herbs are primarily green and red is a complement of green so this combination should work well. Another useful Coleus color is purple. Why? Since most containers are orange (terra cotta) and most plants are green adding purple creates a triadic color scheme. This will result in an extremely vibrant display so use with moderation. Black and white Coleus go well with almost everything so having a few plants of these varieties is always recommended for mixing and matching. Well, you get the picture. Any Coleus can be used to provide an extra punch to each and every display.

So what are you waiting for. Read up on color theory and show us how you use color in Coleus to create stunning containers. Until next time keep on gardening.

Thursday, July 19, 2012

Garden Makeover

Rusty garden table
A smart approach is to start your garden with a theme in mind. This way you can plan ahead for appropriate pots, plants and decoration. After all you want a practical garden that has visual impact and good looks.

For starters, think if you want an edible or an ornamental garden. Our recommendation is a combination of both where you can have fresh ingredients for cooking, and color, texture, and visual impact with ornamentals. Remember to take into consideration your space size and environmental conditions such as the hours of available sun and wind. As a good rule of thumb herbs require at least 6 hours of sunlight while flowers and other ornamentals may require less.

Before the makeover
When we started our garden we didn't have a theme in mind. Actually this whole gardening madness started because I like to cook and I wanted a windowsill garden for a few herbs. (I'm actually helping a friend create hers, keep tuned for this upcoming interesting post.) Turns out our sweet basil grew so much we had to transfer it to a large pot and so our balcony garden started. In the beginning it was mostly the pots we could get, all placed across the balcony floor. (Editor's note: Not the best floor plan for a garden.) 

There is an excellent gardening book which has a lot of information on the different plants that could be appropriate for containers: The Encyclopedia of Container Plants. The author, Ray Rogers, has won numerous awards for plant displays and flower shows, so the book presents lots of ideas about the different combinations you can do based on the shape of the leaves, and the color of the plants and flowers. We have learned about the best combinations and decided to experiment a little (yes, always leave some space/time for experimentation).

It was time for a garden makeover! We went shopping and found some interesting pots and colorful garden tables. After pondering for a while (Editor's note: "a while" = hours) we settled on a rusty theme, which will prove to be very convenient in Puerto Rico's high humidity. We selected several rusty metal tables but incorporated a few wooden pieces and pots that also have rusty accents. 

Color palette is important too. You can use a color wheel to decide on good combinations. Play with analogous colors, which will prove very useful for edible leaves or maybe mix and match complementary colors using your flowers. For our new pots and tables we selected colors that are not too bright but which include white, yellow and some blue and purple. Since most of our plants are just green, we wanted to add some color without overcasting our flowers.

There are also other ideas you can incorporate into your garden. One of our favorites is creating theme pots. You can create a pot that is all about salad, mixing and matching different edible greens like arugula, lettuce, scallions. Combine aromatic plants like basil, parsley, lemongrass and rosemary for a more romantic touch.


After the makeover
As you can see in the picture above, the change is not over-dramatic, but it does add great touches, it looks more organized, it has more shape and depth, it displays better the smaller plants as they don't disappear into larger ones. Every once in a while we rearrange them either because plants achieve their their lifespan or because we get new plants always taking into consideration shapes and color.

We will keep improving our garden and as always, keep you posted. We might start introducing some trees to our garden arrangement. Don't miss the updates.

Sunday, July 15, 2012

The Substitute(s)

Garlic chives in a pot with some cucumber seedlings.
As you may know in the beginning there was basil. Shortly after that there was mint and chives (and parsley and peppers and a whole bunch of other stuff. For the complete nostalgia trip see the original roll call). Incredibly, I haven't written a post about chives (probably because we've had some issues in getting chives to germinate). Chives, Allium schoenoprasum, are a perennial member of the onion family native to both the New and Old World. They are commonly used as an onion substitute. Unlike scallions (another onion substitute) they form a small bulb underground. From this bulb very shallow roots and long, round, slender leaves emerge. These leaves are what we're interested in. Chives are propagated by seeds or division. By division is easier but seeds are more gratifying (and our recommended choice, as always). However, we've had very poor germination rates with chives (You've been warned). At the beginning of summer leaves stiffen and purple edible flowers emerge from the tip. 

In terms of care, chives have needs similar to scallions (which we previously covered here). They require a well-drained soil in a location that receives full sun. Due to their shallow root system chives can grow well in just 3-4 inches of soil. So if you have a shallow container that you can't seem to use (we had a few of those) pair it with chives with no worries. A balanced or nitrogen-heavy fertilizer every 1-2 weeks is recommended for optimum growth. When you are ready to harvest just snip a few leaves at the base of the plant. The following day new leaves will emerge so don't worry if you have to take every leaf. Chives can be grown in a monopot or combopot but our experience tells us that they grow better as a monopot. If you want to grow them in a combopot either plant them first and wait until they are established before introducing new plants or make sure you fertilize heavily each week to help them compete with the other plants in the container.

A few months ago we purchased several seeds from genericseeds.com (the jury still out on the site). I assume you read all about it (shame on you if you didn't) but in case you are coming late to the party here's a link. If you read the post you may notice that we bought garlic chive seeds. Garlic chives, Allium tuberosum, (which is what this post was supposed to be about until normal chives highjacked it or until I noticed I had more to write about chives than garlic chives) are a species that also belongs to the onion family. A staple of Asian cuisine, garlic chives differ from regular chives in that they have flat leaves instead of round leaves, white flowers instead of purple ones, and that they have a more "garlicky" flavor than the typical "oniony" flavor of chives. Some sources point out that when used in cooking they don't tolerate heat well but we have been unable to confirm this. Therefore, use with discretion. In terms of care, they have the same needs as regular chives so follow our advice above.

So if you like onions or garlic but find their flavor too strong give chives or garlic chives a try. You won't regret it.

Saturday, July 7, 2012

Burning the midnight oil

Dama de noche flower. Stunning.
They say New York is the city that never sleeps but nature got there first. It's the original 24/7 operation. I remember years ago being in my mother's small garden waiting to see a spectacle that only happened at night: the blooming of a Dama de noche (Lady of the night). As she described it this plant bloomed only at night peaking at midnight. When daylight broke the flowers would die. The flowers were beautiful and very fragrant. Definitely worth staying awake to watch this. Fast forward to the present. My mother still has her garden and the same dama de noche. Our little garden has many herbs and fruiting plants but very little flowers. Jessica loves flowers so my mom offered us a cutting from her dama de noche. She wrapped it in a damp paper towel and off we went.

Dama de noche in a hanging pot. Each branch can be cut
and grown as a new plant.
Let's put a pause to the sentimental, personal stuff (not even sure why I shared that to begin with) and let's dig into the nerd stuff now. You would be amazed to know that Dama de noche is a cactus. Yeah, a cactus. The scientific nomenclature for this plant is very confusing with many synonyms being recognized but it is usually considered part of the night-blooming Cereus. However, it does not belong to the Cereus genus but rather to the Epiphyllum genus; its full scientific name being Epiphyllum oxypetalum. The species is native to Central America and possibly South America, and is available worldwide through the horticultural trade. It has dark green branches which can grow several feet in length. In nature, the plant grows on trees, much like orchids. Its flowers are large, white, night-blooming and fragrant. Now you might wonder why it blooms at night since most plants bloom during the day. Well, day-bloomers are pollinated by bees, birds, and other diurnal creatures. Dama de noche, on the other hand, is pollinated by bats, moths, and other nocturnal creatures. This also explains why the flowers are so large and white. They are easier to spot at night (Yep, nature is amazing).

A few more flowers just because
If you are growing dama de noche it's certainly not for its looks (it's an unattractive plant in my opinion) but rather for its flowers. Be warned that not everyone gets this plant to bloom, especially on temperate climates. While we don't have a magic formula for making this plant bloom we can offer some tips to improve your chances. Dama de noche can be grown as a monopot (single species in a container) or in a combopot (multiple species in a container). We've found that it grows better in a monopot but it has produced more flowers in a combopot (Yes, nature is weird like that). Dama de noche looks especially nice in a hanging pot but make sure it is properly secured to the wall since the plant can get very heavy. Being a cactus a well draining soil is recommended. Water sparingly but do not allow the soil to dry completely. Fertilize once a month with a balanced fertilizer. Dama de noche prefers full sun but it can grow well in partial shade (3-4 hours of sunlight). It can be propagated via cuttings or (according to some websites) through seed. We wouldn't bother with seeds since cuttings are so easy to obtain and grow. Just snip a small branch from a mature plant and place in moist soil. In 2-3 weeks new branches will emerge and 6-8 months later the plant should be mature enough to produce flowers.

If you like flowers go out there and grow some dama de noche. You won't be disappointed. Until next time.