Saturday, August 25, 2012

In Living Color

Seed grown Coleus in a white container with
some common green plants.
Red and green are complementary colors
We've been away for two weeks visiting a slightly larger island than Puerto Rico called Great Britain. We weren't there on any gardening related adventure (rather just catching some Olympic games) but we saw some interesting concepts that we will probably cover later. <End Completely Unrelated Sidenote.> In our last post (we trust that you read it, but just in case here's the link) we talked about planning your garden, about the importance of a theme. We also talked a bit about taking into consideration the shape and color of your plants to make your garden and containers more interesting. According to Ray Rogers writer of The Encyclopedia of Container Plants (highly recommended) there are five plant design attributes: color, line, form, space, and texture. Today we'll present an example of how to use color in your garden although we're by no means experts (wow, that's a shameless plug of our motto).

Simple color wheel containing primary, secondary,
and tertiary colors
Color theory revolves around the use and combination of primary, secondary, and tertiary colors. We will not go into a detailed explanation of how color theory works (mainly because I don't understand it well myself but also because the link provided does a pretty good job itself) but suffice it to say that the idea is to combine colors which complement each other. A color wheel is very helpful for those of us who need a visual aid to remember how colors interact with each other. When designing your garden you need to consider not just the color of your plants but also the color of the container, background, and even the surrounding plants. Doing so will allow you to create magazine quality displays. Most people relate color in plants to flowers. Understandable with plants being primarily green. The problem is that flowers (with some minor exceptions) are fleeting, delicate things. One day they're here, the next they're gone. Thankfully, there are some plants that are able to add color to a container without producing flowers. One in particular is the example we wish to provide today, Coleus.

White variegated coleus
growing around a bromeliad.
According to Wikipedia the name Coleus was an earlier genus that scientists have recently divided between two genus: Solenostemon and Plectranthus (cookies for anyone who remembers another plant from this genus. Hint: it smells like oregano). There are hundreds of species and cultivars sold as Coleus. Any of them can make an interesting addition to a container garden but we are mainly interested in Solenostemon scutellarioides and its various cultivars. This species occurs naturally in the tropics (Southeast Asia) where it is considered a perennial. In colder climates it is grown as an annual. It generally prefers partial shade but new cultivars have been created that are better suited for full sun. Depending on the cultivar it can trail close to the ground topping at only 4 inches or grow up to 3 feet tall. The size of its leaves is also very varied with some being as small as a few inches while others can grow as large as a foot. Propagation can occur by seeds or though cuttings. The more stunning cultivars are available through cuttings only so you will need to buy young plants from your nursery for the ultimate color punch. We've grown both seed and cutting varieties and the difference is significant (contrary to our usual stance cuttings > seeds).

Two small Coleus and a Bromeliad on an orange container.
Purple, red-orange and green are split-complementary colors.
The reason we love Coleus so much (and the reason we are using them as an example today) is its leaves, which come in every color under the sun, except blue. (Interestingly enough the flowers from the original species are blue, flowers of the cultivars might have other colors) These leaves are usually variegated which adds to the interest. With so many colors it's no wonder that this is one of the most popular garden plants. Young plants are usually available in the nursery all year round but are more prevalent in spring or early summer. Once you select the plants you need to determine the sun conditions under which they will thrive. Too little or too much light may cause the leaves to lose color. Start the plants in partial shade and gradually move them into higher sun intensity. Each plant will let you know how much light it's able to tolerate. Soil must drain well and be maintained evenly moist. After a few months flowers will emerge from long stalks. We recommend pinching them to promote bushy, compact growth although some people like the flowers (to each its own I say). We recommend a balanced fertilizer every 2 weeks. As far as pests are concerned we've seen some aphids and whiteflies which haven't adversely affected growth.

Now that you know how to grow Coleus it's time to use it. Again the basic principle is to combine colors to create a stunning display. Since most plants are green you can use Coleus to break the monotony in any container. For example, you may use a red Coleus in a herb container. Herbs are primarily green and red is a complement of green so this combination should work well. Another useful Coleus color is purple. Why? Since most containers are orange (terra cotta) and most plants are green adding purple creates a triadic color scheme. This will result in an extremely vibrant display so use with moderation. Black and white Coleus go well with almost everything so having a few plants of these varieties is always recommended for mixing and matching. Well, you get the picture. Any Coleus can be used to provide an extra punch to each and every display.

So what are you waiting for. Read up on color theory and show us how you use color in Coleus to create stunning containers. Until next time keep on gardening.

Thursday, July 19, 2012

Garden Makeover

Rusty garden table
A smart approach is to start your garden with a theme in mind. This way you can plan ahead for appropriate pots, plants and decoration. After all you want a practical garden that has visual impact and good looks.

For starters, think if you want an edible or an ornamental garden. Our recommendation is a combination of both where you can have fresh ingredients for cooking, and color, texture, and visual impact with ornamentals. Remember to take into consideration your space size and environmental conditions such as the hours of available sun and wind. As a good rule of thumb herbs require at least 6 hours of sunlight while flowers and other ornamentals may require less.

Before the makeover
When we started our garden we didn't have a theme in mind. Actually this whole gardening madness started because I like to cook and I wanted a windowsill garden for a few herbs. (I'm actually helping a friend create hers, keep tuned for this upcoming interesting post.) Turns out our sweet basil grew so much we had to transfer it to a large pot and so our balcony garden started. In the beginning it was mostly the pots we could get, all placed across the balcony floor. (Editor's note: Not the best floor plan for a garden.) 

There is an excellent gardening book which has a lot of information on the different plants that could be appropriate for containers: The Encyclopedia of Container Plants. The author, Ray Rogers, has won numerous awards for plant displays and flower shows, so the book presents lots of ideas about the different combinations you can do based on the shape of the leaves, and the color of the plants and flowers. We have learned about the best combinations and decided to experiment a little (yes, always leave some space/time for experimentation).

It was time for a garden makeover! We went shopping and found some interesting pots and colorful garden tables. After pondering for a while (Editor's note: "a while" = hours) we settled on a rusty theme, which will prove to be very convenient in Puerto Rico's high humidity. We selected several rusty metal tables but incorporated a few wooden pieces and pots that also have rusty accents. 

Color palette is important too. You can use a color wheel to decide on good combinations. Play with analogous colors, which will prove very useful for edible leaves or maybe mix and match complementary colors using your flowers. For our new pots and tables we selected colors that are not too bright but which include white, yellow and some blue and purple. Since most of our plants are just green, we wanted to add some color without overcasting our flowers.

There are also other ideas you can incorporate into your garden. One of our favorites is creating theme pots. You can create a pot that is all about salad, mixing and matching different edible greens like arugula, lettuce, scallions. Combine aromatic plants like basil, parsley, lemongrass and rosemary for a more romantic touch.


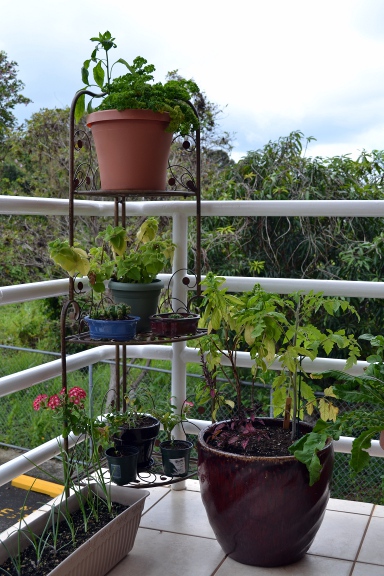
After the makeover
As you can see in the picture above, the change is not over-dramatic, but it does add great touches, it looks more organized, it has more shape and depth, it displays better the smaller plants as they don't disappear into larger ones. Every once in a while we rearrange them either because plants achieve their their lifespan or because we get new plants always taking into consideration shapes and color.

We will keep improving our garden and as always, keep you posted. We might start introducing some trees to our garden arrangement. Don't miss the updates.

Sunday, July 15, 2012

The Substitute(s)

Garlic chives in a pot with some cucumber seedlings.
As you may know in the beginning there was basil. Shortly after that there was mint and chives (and parsley and peppers and a whole bunch of other stuff. For the complete nostalgia trip see the original roll call). Incredibly, I haven't written a post about chives (probably because we've had some issues in getting chives to germinate). Chives, Allium schoenoprasum, are a perennial member of the onion family native to both the New and Old World. They are commonly used as an onion substitute. Unlike scallions (another onion substitute) they form a small bulb underground. From this bulb very shallow roots and long, round, slender leaves emerge. These leaves are what we're interested in. Chives are propagated by seeds or division. By division is easier but seeds are more gratifying (and our recommended choice, as always). However, we've had very poor germination rates with chives (You've been warned). At the beginning of summer leaves stiffen and purple edible flowers emerge from the tip. 

In terms of care, chives have needs similar to scallions (which we previously covered here). They require a well-drained soil in a location that receives full sun. Due to their shallow root system chives can grow well in just 3-4 inches of soil. So if you have a shallow container that you can't seem to use (we had a few of those) pair it with chives with no worries. A balanced or nitrogen-heavy fertilizer every 1-2 weeks is recommended for optimum growth. When you are ready to harvest just snip a few leaves at the base of the plant. The following day new leaves will emerge so don't worry if you have to take every leaf. Chives can be grown in a monopot or combopot but our experience tells us that they grow better as a monopot. If you want to grow them in a combopot either plant them first and wait until they are established before introducing new plants or make sure you fertilize heavily each week to help them compete with the other plants in the container.

A few months ago we purchased several seeds from genericseeds.com (the jury still out on the site). I assume you read all about it (shame on you if you didn't) but in case you are coming late to the party here's a link. If you read the post you may notice that we bought garlic chive seeds. Garlic chives, Allium tuberosum, (which is what this post was supposed to be about until normal chives highjacked it or until I noticed I had more to write about chives than garlic chives) are a species that also belongs to the onion family. A staple of Asian cuisine, garlic chives differ from regular chives in that they have flat leaves instead of round leaves, white flowers instead of purple ones, and that they have a more "garlicky" flavor than the typical "oniony" flavor of chives. Some sources point out that when used in cooking they don't tolerate heat well but we have been unable to confirm this. Therefore, use with discretion. In terms of care, they have the same needs as regular chives so follow our advice above.

So if you like onions or garlic but find their flavor too strong give chives or garlic chives a try. You won't regret it.

Saturday, July 7, 2012

Burning the midnight oil

Dama de noche flower. Stunning.
They say New York is the city that never sleeps but nature got there first. It's the original 24/7 operation. I remember years ago being in my mother's small garden waiting to see a spectacle that only happened at night: the blooming of a Dama de noche (Lady of the night). As she described it this plant bloomed only at night peaking at midnight. When daylight broke the flowers would die. The flowers were beautiful and very fragrant. Definitely worth staying awake to watch this. Fast forward to the present. My mother still has her garden and the same dama de noche. Our little garden has many herbs and fruiting plants but very little flowers. Jessica loves flowers so my mom offered us a cutting from her dama de noche. She wrapped it in a damp paper towel and off we went.

Dama de noche in a hanging pot. Each branch can be cut
and grown as a new plant.
Let's put a pause to the sentimental, personal stuff (not even sure why I shared that to begin with) and let's dig into the nerd stuff now. You would be amazed to know that Dama de noche is a cactus. Yeah, a cactus. The scientific nomenclature for this plant is very confusing with many synonyms being recognized but it is usually considered part of the night-blooming Cereus. However, it does not belong to the Cereus genus but rather to the Epiphyllum genus; its full scientific name being Epiphyllum oxypetalum. The species is native to Central America and possibly South America, and is available worldwide through the horticultural trade. It has dark green branches which can grow several feet in length. In nature, the plant grows on trees, much like orchids. Its flowers are large, white, night-blooming and fragrant. Now you might wonder why it blooms at night since most plants bloom during the day. Well, day-bloomers are pollinated by bees, birds, and other diurnal creatures. Dama de noche, on the other hand, is pollinated by bats, moths, and other nocturnal creatures. This also explains why the flowers are so large and white. They are easier to spot at night (Yep, nature is amazing).

A few more flowers just because
If you are growing dama de noche it's certainly not for its looks (it's an unattractive plant in my opinion) but rather for its flowers. Be warned that not everyone gets this plant to bloom, especially on temperate climates. While we don't have a magic formula for making this plant bloom we can offer some tips to improve your chances. Dama de noche can be grown as a monopot (single species in a container) or in a combopot (multiple species in a container). We've found that it grows better in a monopot but it has produced more flowers in a combopot (Yes, nature is weird like that). Dama de noche looks especially nice in a hanging pot but make sure it is properly secured to the wall since the plant can get very heavy. Being a cactus a well draining soil is recommended. Water sparingly but do not allow the soil to dry completely. Fertilize once a month with a balanced fertilizer. Dama de noche prefers full sun but it can grow well in partial shade (3-4 hours of sunlight). It can be propagated via cuttings or (according to some websites) through seed. We wouldn't bother with seeds since cuttings are so easy to obtain and grow. Just snip a small branch from a mature plant and place in moist soil. In 2-3 weeks new branches will emerge and 6-8 months later the plant should be mature enough to produce flowers.

If you like flowers go out there and grow some dama de noche. You won't be disappointed. Until next time. 

Wednesday, June 13, 2012

Grow and Bake: Herb Bread

Ready-to-eat soft herb rolls.
A great way to make use of your edible garden plants is to improvise in the kitchen once in a while. I love the kitchen and I've made quite a few recipes with our garden fruits (and veggies), some of which I've shared with you such as a basil pesto, and arugula pesto recipe. Today I want to tell you about a bread recipe we tried. A dear friend (you know who you are and we hope you are reading this) came to visit us and he taught us how to do several kinds of bread. Of course, we wanted to use our garden herbs to make them more tasty. We initially used thyme but we have repeated the recipe several times using basil and rosemary. These three herbs are among the Top 8 Herbs to Grow for Bread Baking.

Making bread is tricky. It's not just about following a recipe. You need to familiarize yourself with certain basic concepts and have some specialized equipment at hand. Let's go over them.

Before you even start looking at the ingredients you will need the following equipment: a measuring scale, a mixer, and a baking thermometer. You will need a scale to measure ingredients because their weight is affected by humidity and elevation. The mixer is optional but preferable as it takes a lot longer to knead by hand. The thermometer needs to be able to measure up to 400ºF (200ºC). Beware that most meat thermometers do not reach these temperatures.

The bread recipe we use includes ingredients you are likely not to have at home, so make sure you have all the ingredients before starting anything.

Ingredients:
  • 12.5oz (375g) water
  • 0.75oz (22g) yeast, fresh
  • 1lb 5oz (625g) bread flour
  • 0.4oz (12g) salt
  • 2oz (60g) sugar
  • 1oz (30g) nonfat milk solids
  • 1oz (30g) shortening
  • 1oz (30g) butter
Mise en place
Perform your mise en place (Editor's note: yes, Jessica also likes the fancy words) by placing each weighted ingredient separately in small bowls. Either by hand or in the mixer start by mixing fatty ingredients such as shortening and butter. This will start breaking the fats which makes everything mix better. Add the salt, milk solids, water, and sugar and start adding little by little some of the flour. After mixing for a minute or two, stop the mixer.

Lay a bed of flour on the top of the mixture and on top of that add the yeast. Note that the recipe calls for fresh yeast but we used instant yeast with no observable differences. You can substitute for active yeast but this is not recommended as the dough will not rise much and the bread will be dense and hard (believe us, we know by experience). You want bread to be soft and fluffy. Top the yeast with more flour and start mixer again. The reason to place the yeast in between layers of flour is because the milk and salt kill the yeast. Add 1/4 of the remaining flour and then gradually keep adding flour. It is possible (although unlikely given Puerto Rico's humidity) that you won't need all your measured flour.

Pay close attention to the dough, it will start to separate from the mixer bowl walls becoming a ball around the mixer attachment. When the dough has detached completely, including from the bottom of the mixer bowl, stop the mixer and do the dough windowpane test. The dough windowpane can be verified by taking a tiny portion of the dough and stretching it between your fingers. You should be able to see the dough stretch about an inch without breaking. If the window breaks it is not ready. Keep adding flour until the mixture detaches from the bottom and the appropriate dough windowpane is observed.

When the dough is ready it is time to add your herbs. About 0.18oz to 0.28oz (5g to 8g) of your favorite herb is enough. Decide based on how strong the flavor of the herb is and the intensity you want on the bread. We used 5g of thyme, about 5g of rosemary and 8g of basil for ours.

Pinch dough while rolling
Fermentation is an important part of the process. Create a ball with the dough, folding the sides over the center towards the bottom part of the dough until you create a seam-free ball. Roll the dough in a tight circle on a flat surface such as the kitchen counter to make the surface as smooth as possible. Don't use too much flour to dust the surface, the dough must stick a little to the counter for the technique to work. Pinch the dough against a flat surface (read: kitchen counter) for better results.

Place the dough on a deep bowl and cover with plastic wrap. Let it ferment for 1 to 1-1/4 hours at room temperature. If you used fresh instant yeast, the dough should double in size. Remember that with active yeast, the dough won't grow too much (yes, active sucks). When fermentation time has elapsed, punch down the dough allowing air to escape. The punch relieves stress on gluten, squeezes out excess carbon dioxide, and divides air pockets evenly which makes it easier to shape the dough resulting in softer bread.
First fermentation: 1 to 1-1/4 hour

This dough can be used to make loafs, soft rolls and even cinnamon bread. We decided to do soft rolls. Divide the dough into 2oz pieces, it will yield about 20 bread rolls. Roll each piece into seam-free balls as before.

Now we need to perform a second fermentation, better known as proofing, for 15 to 30 minutes in a high temperature, high humidity environment. Tip: You can use your microwave. Bring water to a boil in a small bowl and place your rolls inside. The steam will create enough heat and humidity for this second fermentation.

If you want your rolls to be nice and golden you can brush eggs whites or butter on top of the rolls. Bake at 400ºF (200ºC) until rolls have reached the same internal temperature. To check the temperature place thermometer (finally we get to use the thermometer!) from the side so as not to disrupt the aesthetic of the rolls. The rolls should reach the appropriate temperature in about 15 to 20 minutes.

Let them cool down a little before eating, chemical processes are still happening for several minutes after your remove them from the oven and the flavor would be different. Spread some butter or cream cheese and enjoy!

Update: Our "dear friend" came over to our house and notified us of some errors in this post. So we've made some slight corrections. We apologize for this inconvenience and thank you for choosing container gardening in Puerto Rico.

Saturday, June 2, 2012

Attack of the Rotten Tomatoes

Blossom end rot on our roma tomatoes.
Dear reader, it seems we never run out of problems in our little garden (Good thing we never said we were experts). Our loss is your gain though. We planted a Roma tomato plant a few weeks ago. Everything was progressing nicely. The plant was growing, flowers were blooming, fruit was growing. How happy we were. That would soon change (yes, I'm being overly dramatic but editorializing is "in" these days).

We started noticing a small dark spot on the bottom of one of the fruits. "No big deal" I thought, probably a bird nibbled on it. It's salvageable. The next day the spot was larger. The day after that the spot was even larger and an adjacent tomato also had a similar spot. Houston, we have a problem. (Good thing I had foreshadowed this in the previous paragraph or you would be in for a surprise at this point).

The problem? Blossom end rot. Actually, if we were to go overly technical (which I tend to) the problem is calcium deficiency. "Blossom end rot" is just a description of what we see. Now at this point you are probably thinking "I'll just add calcium to the soil and fix the problem". Having proper amounts of calcium at the time the fruit sets prevents blossom end rot which is why we recommend placing crushed egg shells near the roots when transplanting tomatoes, peppers or any other member of the Nightshade family. However, more often than not the cause for the calcium defficiency is not a low amount of calcium in the soil but rather one of the following: uneven soil moisture, improper use of high nitrogen fertilizer, or high amounts of phosphorus.

This disorder typically affects the first fruits of the season and once it presents itself it is very hard to overcome. Therefore, the best strategy is prevention. If you use a high quality potting soil phosphorus shouldn't be a problem. Also, if you follow the manufacturer recommended dose and fertilize every other week excess nitrogen shouldn't be a problem. In any case we recommend light fertilization when the first fruit are being set. That leaves us with uneven moisture which is the most likely cause for blossom end rot in the tropics (sure enough this was our problem). Due to the large amounts of rainfall followed by very hot temperatures maintaining a constant moisture level is always a struggle. We offer the following three tips to help overcome this challenge.
  1. Mulching - Mulch reduces evaporation and helps maintain moisture in the soil. 
  2. Plant placement - Placing your plants in an area where rainfall doesn't fall on them will also help you be in control of moisture rather than being at the mercy of nature. 
  3. Watering - Proper watering is very important not just to prevent blossom end rot but to achieve healthy plant growth. Watering is, in theory, simple. Don't overwater your plants and don't let them dry out. In practice, watering requires knowledge, skill, experience, and intuition. A good rule of thumb is to touch the soil. If it feels hot it needs water; if it's cool it doesn't need water. However, each plant has different moisture needs which is why we say several attributes are needed in practice.
We hope you never encounter blossom end rot but if you do we hope this post helps. Just remember to be patient. It takes time to heal after all. 

Thursday, May 24, 2012

Thyme

Our little thyme bush.
We've harvested leaves a few times already
Thyme is a perennial herb belonging to the Thymus genus in the Lamiaceae family (aka the mint family). A large variety of species and cultivars are available ranging from woody shrubs to trailing plants. Not all species are used for culinary purposes though as some are used as ground cover or ornamental plants. The most common species (Thymus vulgaris) is the one mainly used in flavoring meats, soups, stews, and even breads (If you ask nicely Jessica might even share the thyme bread recipe on a later post).

If you want to grow thyme you have three options: seeds, cuttings or nursery plants. If you are interested in one of the cultivars such as lemon thyme you will need to obtain cuttings from a fellow gardener or buy plants at the nursery since no seeds are available. For common thyme all three options available to you. Obviously, we chose seeds (If you follow this blog you should know that we love growing plants from seed. If not, what are you waiting for? Follow us...and bring cookies).

We've found thyme extremely easy to grow from seed. The only challenge is getting from the seedling stage to the transplant stage. Since the seeds are very small we planted quite a few (As a rule of thumb the smaller the seed the lower the germination rate). When they sprouted we had to thin quite a few to make it manageable. We ended up with three or four plants in a relatively small container (see picture). After that it's smooth sailing. Being native to the dry Mediterranean thyme requires little care and attention. Similar to other herbs thyme does best in well-draining potting soil on a full sun (6+ hours of sunlight) location. Only water when the soil is dry and apply a balanced fertilizer every other week for optimum growth. To harvest just cut the desired sprigs and remove the leaves from the stems before cooking.

Due to its versatility in the kitchen and its low maintenance requirements we recommend thyme for even the laziest of gardeners. And if you have lemon or orange or lavender or any other crazy cultivar give us a shout. We would love to add one to our garden.