Sunday, April 22, 2012

Three for the price of one

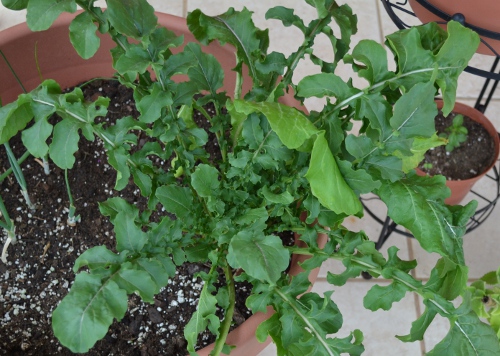
Our cilantro plants. Notice how the one
in the center is bolting.
Who doesn't like to buy one and get two free? Well that's what you get when you plant cilantro, also known as coriander or Chinese parsley (people like to call the same plant different names just to confuse other people). Cilantro (Coriandrum sarivum) is a cool season annual herb in the Apiaceae family. This family contains many well known herbs and vegetables such as carrots, cumin, dill and parsley.

So what are the three things you can get when you grow cilantro? The most common part to harvest are the leaves. These are usually sold fresh at the supermarket in tight bunches. The second thing you can obtain from cilantro are the dry fruits or "seeds". These are used as a spice in various cuisines. The fruits are usually sold as "coriander" in Puerto Rico and can be found in dried whole form or as crushed powder. The last thing is one that you usually don't find in Puerto Rico since it is mainly used in Thai cuisine, cilantro root. To be honest I've never seen one myself.

So how do you grow cilantro? Cilantro is typically grown from seed since it doesn't transplant well. Seeds can be found almost everywhere in Puerto Rico.(Health advisory: Seeds sold for sowing are coated with a poisonous substance to prevent them from being eaten by ants and other animals. Therefore, it goes without saying, do not use them for cooking. Now back to your scheduled programming.) Directly sow your seeds about 2-3 inches apart in a well draining soil or potting mix. Once the seeds sprout move the plants into full sun and make sure the soil is kept moist. Fertilize with a balanced fertilizer or a high nitrogen fertilizer once in the season. Now, when should we grow cilantro? Well, it really depends on what part of the plant you wish to harvest. Since the plant tends to bolt quickly in hot weather (read: typical Puerto Rico weather) it is best to grow it in  late fall, winter, or early spring if you are interested in the leaves. After a plant bolts leaves become bitter and should not be used for cooking. If you are only interested in the fruits/seeds you can grow it in summer. The plant will quickly bolt and you will have flowers, and therefore fruits, faster. For roots you should also grow in late fall/winter/early spring since the roots will have more time to develop. 

Leaves are described as having a citrus flavor. They can be harvested at any time and are used fresh in dishes since heat tends to change its flavor. Sometimes they are just used as a garnish. (Jessica uses cilantro leaves in her patented "sofrito" recipe. Maybe she'll write a post about that later.) Seeds can be used either toasted or dried. Fresh, toasted seeds have a more potent flavor. They are used commonly used in Indian cuisine in curries and in other cuisines for seasoning meats and potatoes. Roots are used to flavor Thai dishes such as soups or curries.

Cilantro doesn't suffer from any major diseases but ours have been attacked by the dreaded aphids. As we've mentioned aphids are usually accompanied by ants. In order to control the aphids you first need to eliminate the ants. Then use insecticidal soap on the underside of leaves.

That's it for cilantro. What are you waiting for? Go out there, purchase some seeds and grow some cilantro. It will be well worth it.

Friday, April 6, 2012

Disease:Cucumber Wilt

Cucumber wilt
A few days ago I arrived to find one of our three cucumber vines extremely wilted. Instinctively, I thought "Did I forget to water them this morning? Did I accidentally skip them in my morning routine? Did I do it subconsciously? Do I hate cucumbers but haven't realized it yet? Am I such a horrible person that I can't take care of my plants properly? Imagine how you will do when you have kids. Nooooo!!! "<end rant>. Then the rational part of the brain kicked in. The other two vines which share the same pot weren't wilted so it couldn't have been lack of water. There wasn't anything wrong with this particular vine. In fact, it was thriving, already having produced cucumbers while the other two hadn't. A mystery. I checked my bible and there was no mention of anything that would affect cucumbers so suddenly. Google time. About 607,000 results (0.28 seconds). Answer - Disease:Cucumber Wilt.

Cucumber wilt (Erwinia tracheiphila)  is a bacterial disease transmitted by the cucumber beetle. This animal (actually these animals since cucumber beetle is a term used for various species of beetle) and its larvae can be found in various plants in the Cucurbitaceae family (squash, cucumber, pumpkin, watermelon, etc). They lay eggs on the underside of leaves. Once the larvae hatch they start feeding on the roots of a plant or on the soft stems of young plants. Today's lesson: "Always check the underside of leaves. Bad critters tend to dwell there. Example: cucumber beetles, whiteflies, the dreadful aphids." <end today's lesson> These beetles can also transmit another nasty disease called cucumber mosaic virus (CMV). Hopefully we'll never have to write about that one.

The most obvious symptom of cucumber wilt is vines that have been well watered suddenly wilting. Before this happens though the leaves of your vines will exhibit dull green patches. However, the onset of the disease is so fast that you may never notice this dullness. I know we didn't. After a plant is infected slime clogs the water conducting tissue thus causing the plant to dry out and wilt. Fruits may become wilted themselves. Once a plant becomes infected there is no cure. The best thing to do at that point is to destroy the affected plant. (Doesn't it suck when you realize you are powerless to do anything to save your plants. Lesson: Nature > us)

Prevention is the most important step in controlling cucumber wilt. So how do you prevent it? Healthy plants are naturally more resistant to diseases. Water your plants regularly and inspect them every day. Plants that have been subjected to drought or water stress are more likely to be infected by this disease. If you find any eggs on leaves promptly destroy them by squashing them with your hands. Some sites on the internet suggest putting a cloth or barrier around seedlings and young plants to prevent adults from laying eggs on your plants. Personally, I find this very impractical if you are only planting two or three vines. As a last, last (and we mean last) resort pesticides can be used to kill the eggs and larvae. However, be mindful that at some point you will be consuming fruits from this plant so toxic pesticides should be avoided.

Now you know what to do (or not to do) when you encounter cucumber wilt. If you have experienced this let us know in the comments section. Until next time keep on gardening.

Sunday, March 18, 2012

Arugula Pesto

Our first Arugula. Has grown quite a bit, right?
Little has been said about our arugula since October's Arugula Follow Up. Our first plant has been growing and growing. It's now at the point where it will flower. We made a delicious salad for Thanksgiving with some of its leaves mixed with some lettuce (as we have mentioned before, arugula has a peppery flavor and ours is quite spicy so we can't use it by itself). We have also managed to grow one more arugula plant. Both plants have lots of leaves.

Because its flavor is so particular, arugula is also frequently used cooked as a vegetable. In this form it is used in pastas or even in pizzas, added just before the baking period ends or immediately afterwards, so that it will not wilt in the heat. Similar to basil, it combines really well with mozzarella cheese and sun-dried tomatoes and is good for pesto. Unlike basil, it is considered an aphrodisiac.(Editor's note: It seems Jessica is throwing out a hint to all of our female readers. Gentlemen, if your wife starts using arugula instead of basil, "It's on!".)

The process of making arugula pesto is not too different from the one described on our Basil: Yucky, Yummy Edition. Our previous recipe yielded pesto for about 6 to 8 people but I edited today's ingredients to make a dinner for 2.

Ingredients
(Mickey is the salt and pepper)
Ingredients:
- 1 cup packed fresh arugula
- 1/4 tablespoon minced garlic
- Salt and ground pepper
- 1/4 cup pure olive oil
- 1 tablespoon pine nuts, toasted
- 1/4 cup freshly grated Parmesan

Directions:
The secret for making pesto with arugula is to blanch the leaves. Plunge the arugula into boiling water for about 15 seconds. Next, plunge the leaves into ice cold water to stop the cooking process. Shake off the excess water and drain well.

Pesto with extra pines nuts
Squeeze the water out of the arugula with your hands until very dry. The rest of the process is quite similar to basil pesto. Chop the arugula and put in a blender or food processor. Add garlic, salt and pepper to your liking, olive oil, and a tablespoon of toasted pine nuts. Blend for at least 30 seconds. Add the cheese and pulse your blender to combine. You're done.

Prepare a meal and let us know about your experience with arugula in the comments section.

Friday, March 16, 2012

New Seeds on the Block

New seeds on the block
It's that time of the year when I go crazy and purchase a bunch of seeds that I probably shouldn't have. But who's there to stop me? *Insert maniacal laughter* I was interested in growing some peppers which I couldn't find locally so I took my talents online (Insider joke for our basketball enthusiast readers). After a few days of research I settled on genericseeds.com (reserving final judgment on the site for now but so far so good). I ordered the following seeds:
  • Chocolate Beauty Pepper
  • Golden California Pepper
  • Horizon Orange Pepper
  • Purple Beauty Pepper
  • Scarlet Nantes Carrots
  • Beefsteak Tomato
  • Garlic Chives
  • Sage
  • Red Burgundy Onion
  • White Sweet Spanish Onion
  • Yellow Pear Tomato
This will be our first time trying out onions and carrots which has us very excited about these seeds. Not to mention the possibility of having four different pepper colors available for stir fries, and tomatoes for salads, sandwiches and burgers. *Yum*

As mentioned in our previous post (our first product review) we planted the seeds in Jiffy's Seed Starting Mix®. After almost two weeks everything but the sage, and the golden and purple peppers has sprouted. Not bad considering we usually plant a single seed per tray location. I'm still hopeful that the remaining peppers will sprout since the reason I purchased the seeds online was to get a purple pepper plant. Yesterday I (Jessica is sick so no "we" this week) transplanted the tomatoes and the peppers since the Jiffy mix doesn't contain any nutrients and these have a tendency to grow quickly in our warm weather. Lesson from our personal experience: Leaving fast growing seedlings in the mix too long will cause stunted growth and poor yield. In a few days I plan on transplanting the onions, carrots, and chives. If everything goes well we should have carrots and peppers in two months, tomatoes in 3 months, and onions in 4-5 months. Stay tuned to monitor the progress of the new seeds on the block and for more on container gardening in Puerto Rico.

Sunday, March 11, 2012

Product Review: Jiffy Seed Starting Jiffy-Mix®

Our 10 Qt. Jiffy bag.
Welcome to our first ever product review! Here we will either be praising or bashing a product we've used in our garden. The first victim product to be reviewed is Jiffy's Seed Starting Mix®. This is a very popular brand that is widely available in Puerto Rico. This light, loose, soil-less mix consists of peat moss and vermiculite and is designed to promote fast germination and root growth. It doesn't contain any nutrients so this is only meant for germination not for long-term growth. It comes in various sizes including 4, 10, and 16 Qt. bags. The larger sizes are excellent for planting a good number (35-50) of seeds at once.

Let me get this out of my system first. I initially hated this product. Why? Because when I took the stuff out of the bag and watered it it became a swamp. Literally the stuff would not absorb water. It seemed impermeable. And I wasn't alone in this predicament. Several reviewers in Amazon and other websites had suffered through the same experience. Was I was supposed to put my seeds in this stuff? No thanks.

But being as stubborn as I am (did I just admit that?) I wouldn't give up on the product. I first started out trying to grow a few peppers, a couple of tomatoes and some herbs. We had previously used these same seeds on Jiffy pellets with great results. Success rate with the mix was lower than 25% (*Insert sad face*. Side note: blogger should have native emoticon support available for posts. They actually direct you to external websites for your emoticon needs. Sigh). After that I tried my luck with a few lettuce seeds. Success rate increased to about 50% but I still wasn't satisfied with the product since it still wouldn't hold water properly (and 50% germination rate is not good anyways).

Left - Jiffy mix out of the bag, Middle - Swampy Jiffy mix,
Right - proper Jiffy mix after stirring with water
I let the product go unused for a few weeks since I was both frustrated with it and waiting for a seed order I had made with genericseeds.com (good prices, reserving a final verdict on quality until we use more seeds). We went to a local nursery on an unrelated trip to pick up a palm tree for a neighbor and the attendant was using a similar product. He told us that he uses the mix but that it bogs down unless you know the trick: Water and elbow grease. He told us to add water to the mix and stir it continuously until it becomes mud-like. Then it's ready to use. Excited with these news I anxiously waited until the seeds arrived. When the time had come I stirred and mixed until a mud-like consistency was achieved. Success! Then we deposited the mix into our germination tray and planted close to 30 seeds. As of this writing we have a germination rate of 85% and climbing. Nice!

Verdict: If you're looking for an alternative to pellets or are looking to germinate a large number of seeds we recommend this product. Follow our advice and you should have no problem obtaining great results with this mix.

Disclaimer: Container Gardening in Puerto Rico is not affiliated with the company that makes this product or any of its affiliates. We did not receive any free products or other compensation for this review.

Saturday, February 11, 2012

The Rose of Mary

Our Rosemary (front) with thyme
and other flowering plants keeping it company
Rosemary (Rosmarinus officinalis) is a perennial herb belonging to the mint family (Lamiaceae). Members of this family, which include mentha, basil, sage, and others, are among the most fragrant plants in the world. According to Wikipedia (help out by editing it or donating) the name "Rosemary" comes from the Latin rosmarinus which means "dew of the sea" because in many locations the only moisture it needs to survive is the dew from the sea. Legend has it that the Virgin Mary once spread her blue cloak over a rosemary bush and the flowers turned blue. Afterwards, the shrub became known as Rose of Mary.

Rosemary is an evergreen shrub native to the Mediterranean which, luckily for us, easily adapts to tropical conditions. It can grow up to 5 feet but in containers it usually grows to 2-3 feet (Ours is about a foot tall at the moment). Its fragrant leaves, which are easily recognized since they look like miniature pine needles, are commonly used in the preparation of various dishes such as meats, soups, and even pesto. Who hasn't tried a rosemary chicken breast or rosemary bread. Delicious! (Editor's note: Need to convince Jessica to make some rosemary pesto)

 Rosemary can be grown from seed or cuttings. Even though we usually prefer seeds (watching plants sprout is a soul satisfying experience in my opinion) we've experienced a poor germination rate so we would recommend cuttings or buying young plants at a nursery. Another reason to use cuttings or young plants is that you will find a wider variety of cultivars than from seed. The common rosemary is a tall upright plant with thin leaves and blue spring flowers (We haven't seen any flowers on ours yet). The cultivars can be short, bushy, sprawling, upright with broad, short or thin leaves and blue, white, and even pink flowers. Even the fragrance can change from one cultivar to the other.

The bible (The Bountiful Container by McGee and Stuckey) recommends that rosemary be planted on a container of at least 8 inches in depth. However, ours has been happily growing in a 3 inch pot. Although I suspect that we will need to repot it soon. Rosemary, true to its Mediterranean origins, prefers dry conditions, however, the soil must not be allowed to dry completely or the plant will (almost instantly) die. Be careful though because overwatering will cause root rot which will also cause the plant to die. The moral of the story is that you will need to find the right balance between watering and dryness for the plant to thrive. We planted ours in a good draining soil which we let dry between waterings. Place your plant in a sunny location so that it receives between 4 and 6 hours of sunlight. Fertilize it every week or two weeks with a balanced fertilizer or one with a high nitrogen content (you are interested in the leaves after all).

We haven't experienced any pest problems with our rosemary but nevertheless you should check your plants regularly, especially if pests are present in your other garden plants. If you feel generous (always remember to #spreadthelove) or you want more for yourself you can propagate your rosemary using the cuttings method we've previously discussed (see Propagation:Cuttings). So what are you waiting for? Go to your local nursery and get yourself some rosemary.

Sunday, January 29, 2012

The One with Strawberries

Strawberry. Success!!!
If you follow us on Twitter (Shameless plug alert: Follow us @ContnrGardenPR) you know that we're very excited about our strawberry plant. Just thinking of being able to taste fresh strawberries makes us salivate. However, our excitement was subdued by the fact that strawberries are difficult to grow in the tropics (see The Holy Grail post). They are prone to fungus and root rot due to the high humidity of Puerto Rico. To avoid this make sure your plants are in a well-ventilated area and that during watering no water falls on the leaves. Strawberries may also be victim to the dreaded aphids (We don't have a solution for this one yet but we're working on one.)

Against all odds, and much to our delight, in December our little plant produced a few flowers. Excitedly (and a little compulsively), we observed each day (did I say we were compulsive) how one of the flowers started to become a green strawberry fruit. We cared for it by keeping the soil moist and providing a balanced fertilizer every week.

The time had come. After a few weeks it ripened to a bright red color. We carefully cut the fruit from the plant, washed it clean, and cut it in half (Jessy and I both wanted to taste it). Taste-wise our strawberry tastes slightly less sweet than a supermarket bought fruit. I was expecting a bitter aftertaste but I was pleasantly surprised that it had the flavor I'm used to. In terms of size a supermarket fruit dwarfs our little strawberry which was to be expected. And now we wanted more.

Mother plant sending out a stolon. 
One of the nice things about growing your own strawberries (besides that sweet fresh flavor) is that they're easy to propagate. The plants you buy at the nursery are called mother plants. They send out runners called stolons which produce multiple daughter plants. Daughters can be potted and allowed to root (or they could be removed to allow the mother plant to concentrate on fruit production). Keep the potting soil moist and they should develop roots in a few weeks. Once they are fully established you can cut the connection to the mother plant (much as you cut the umbilical cord from a newborn). Voila! You have a brand new plant. With this simple technique you are able to multiply your plants almost infinitely since each daughter plant will become a mother plant after one growing season. As always remember to #spreadthelove by gifting plants to your friends and neighbors. Finally, let us know in the comments section if you've had experience (and hopefully success) in growing strawberries in the tropics.